Ok, time to get Gleba right.
Gleba is one of the planets in Factorio’s Space Age DLC, and has a reputation for being the most hated of the 4 new planets. Factorio is all about factories and making stuff - you figure out how to play the first earth-like planet Nauvis building your factories to handle limited patches of resource; then once you get to space you get to solve Vulcanus, a volcanic world with new challenges and hazards, but effectively unlimited mineral resources; and then Fulgora, a dead dry world that has effectively unlimited scrap to recycle.
So far so good.
Gleba is next - and is organic, a wet, living world, covered in plants, fungus, weird five-legged monsters … and fruit trees. Unlike the first two worlds where you mine mineral resources, smelt them and make new stuff, on Gleba you harvest fruit, and then process (ferment ?) them into new materials, from which you build stuff. As you progress, you get more and more space to build your fruit farms, and so you can really get going …
… except … things go off.
Harvest fruit, leave it in the train too long, and it spoils. Make some of the intermediate products, they get stuck on a belt, and unlike all other resources and products you’ve dealt with so far, they spoil. Even the Agricultural Science that you’re on the planet to make will spoil.
And if you’re not careful … when you process the fruit into the first products, you get a small fraction of seeds to replant. If they spoil, you don’t … and suddenly you’re out of seeds and your farm is barren.
However, a few people clearly love Gleba, and on a previous run I got it up to 900 Agricultural science / minute - which isn’t bad, not megabase standards, but not far off. How I make this work:
- throughput : keep things flowing. Resources literally grow on trees, so you have unlimited resources - so it doesn’t matter if you don’t use it …
- … as long as you process the two fruits as part of the first step, to get the seeds. With a little effort, you’ll be drowning in seeds and have to burn them; get it wrong, and you have none.
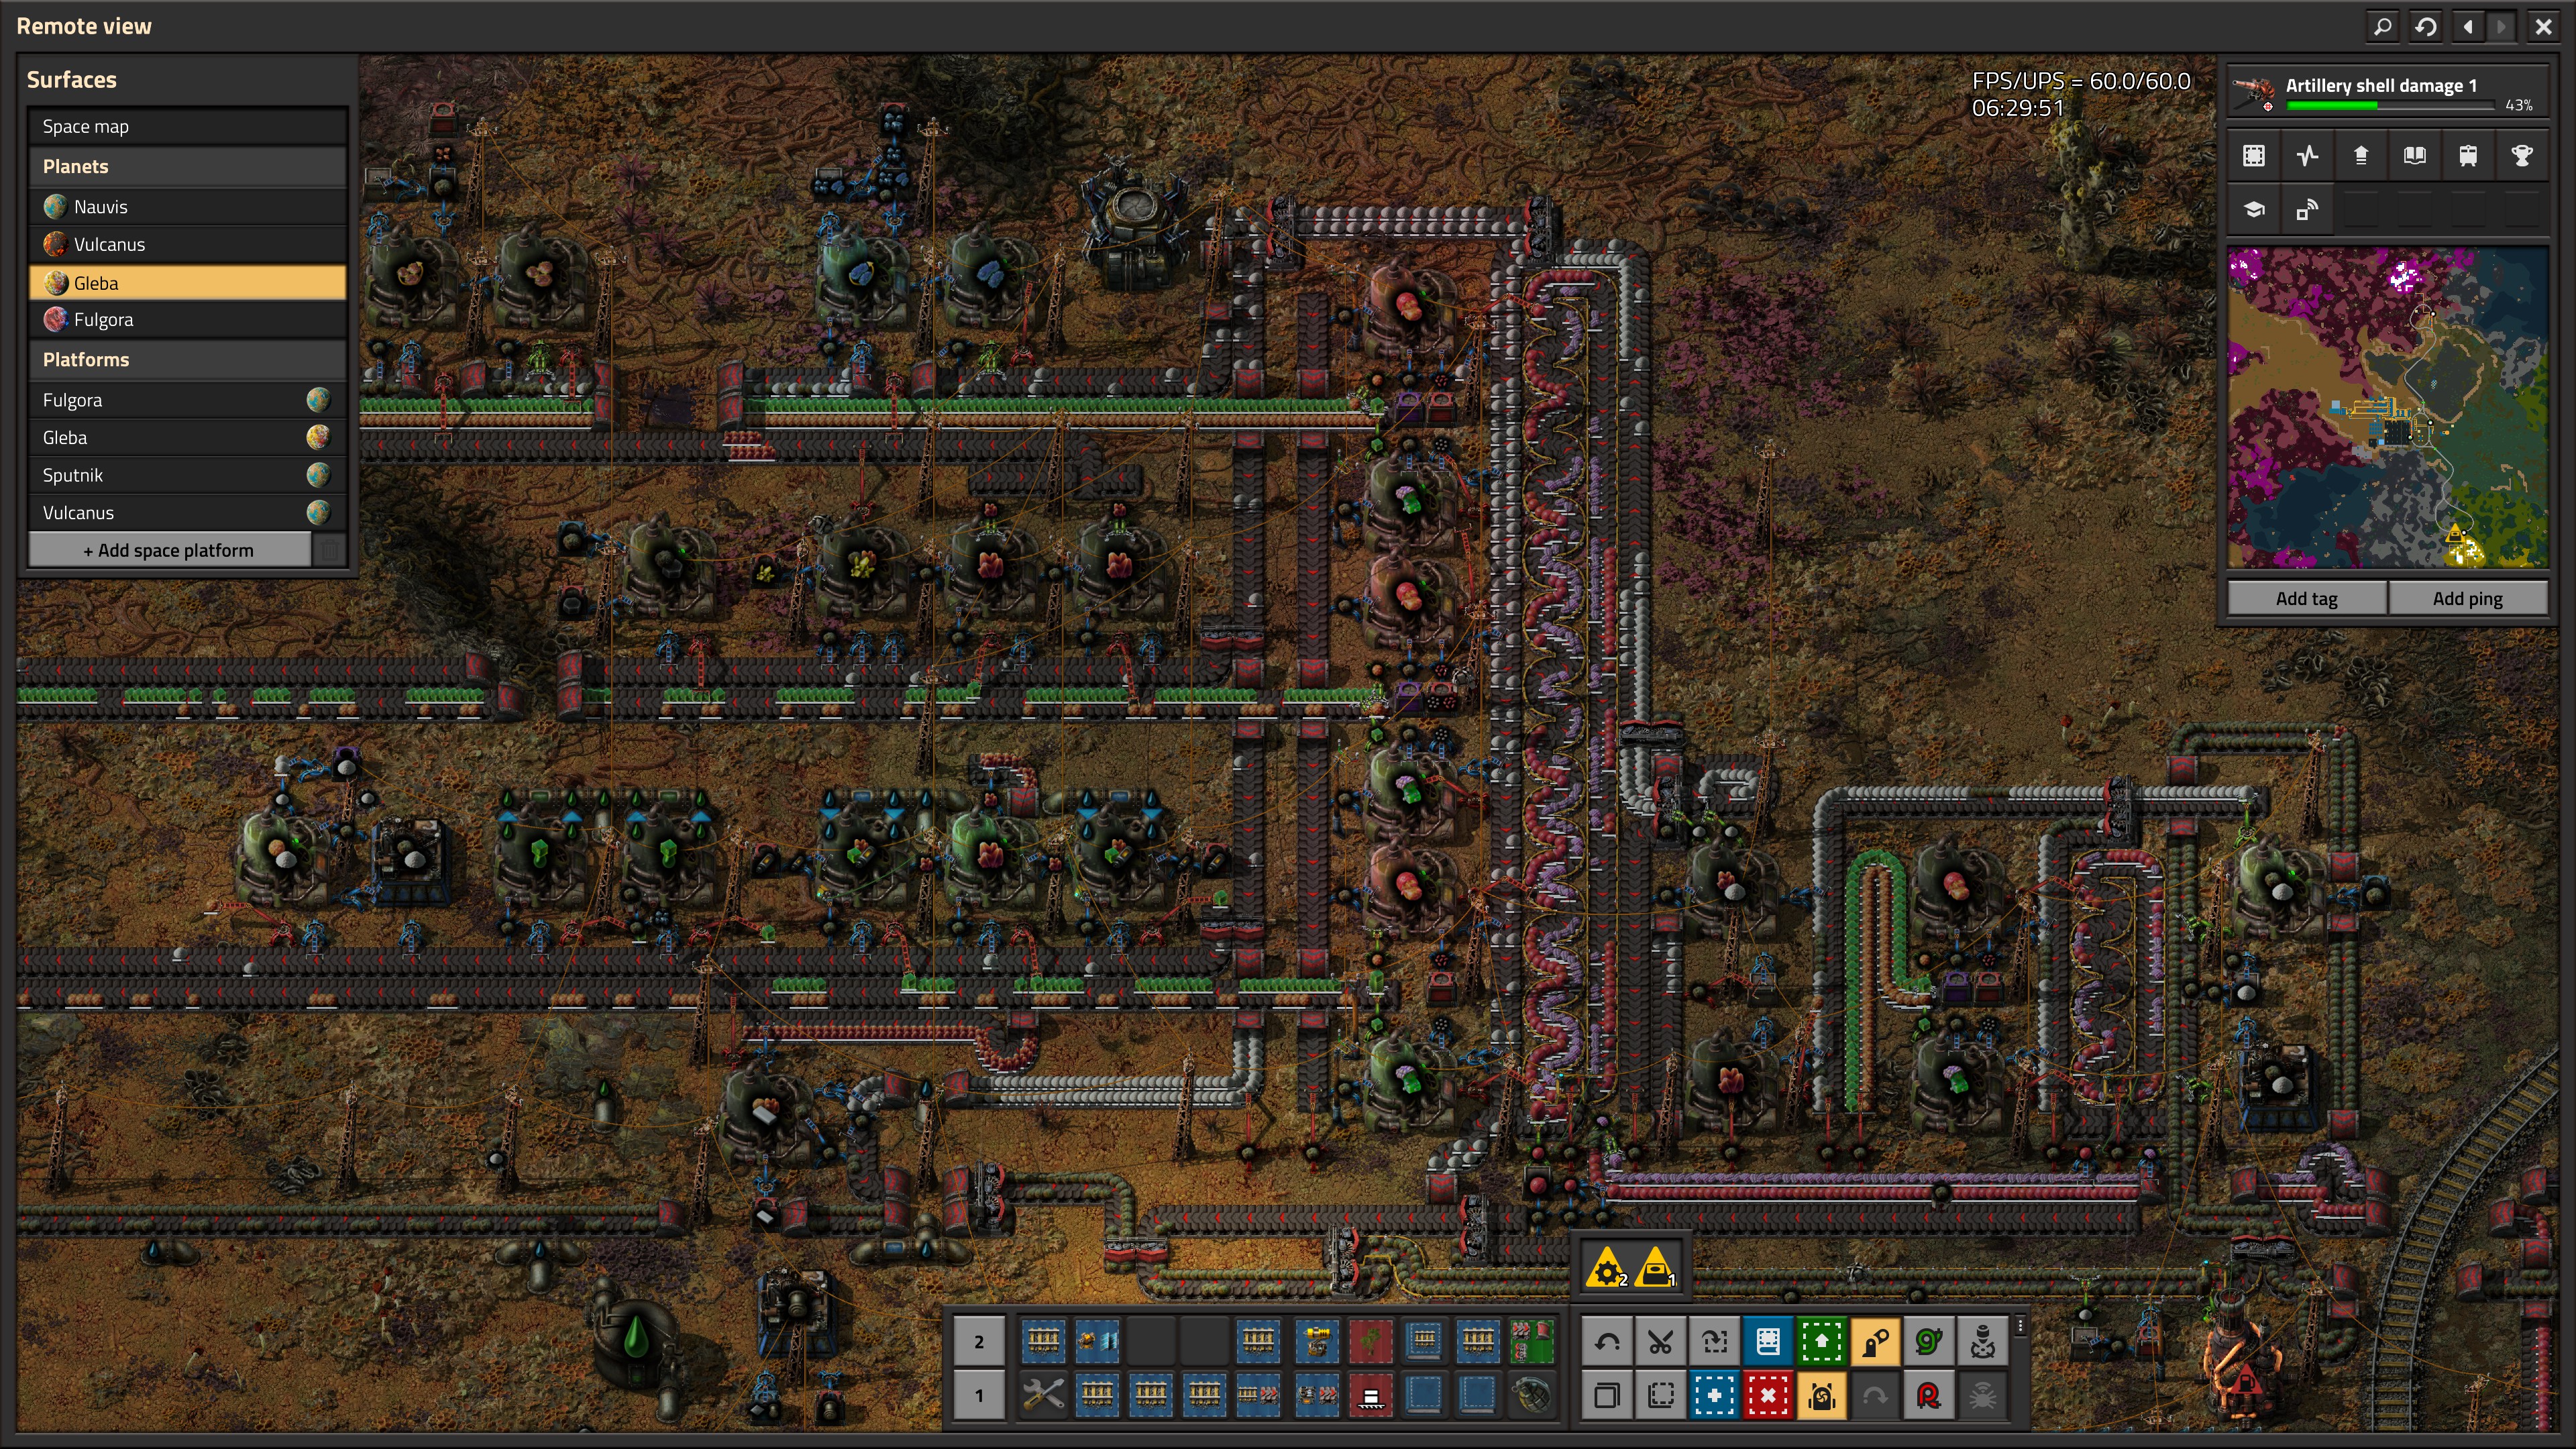
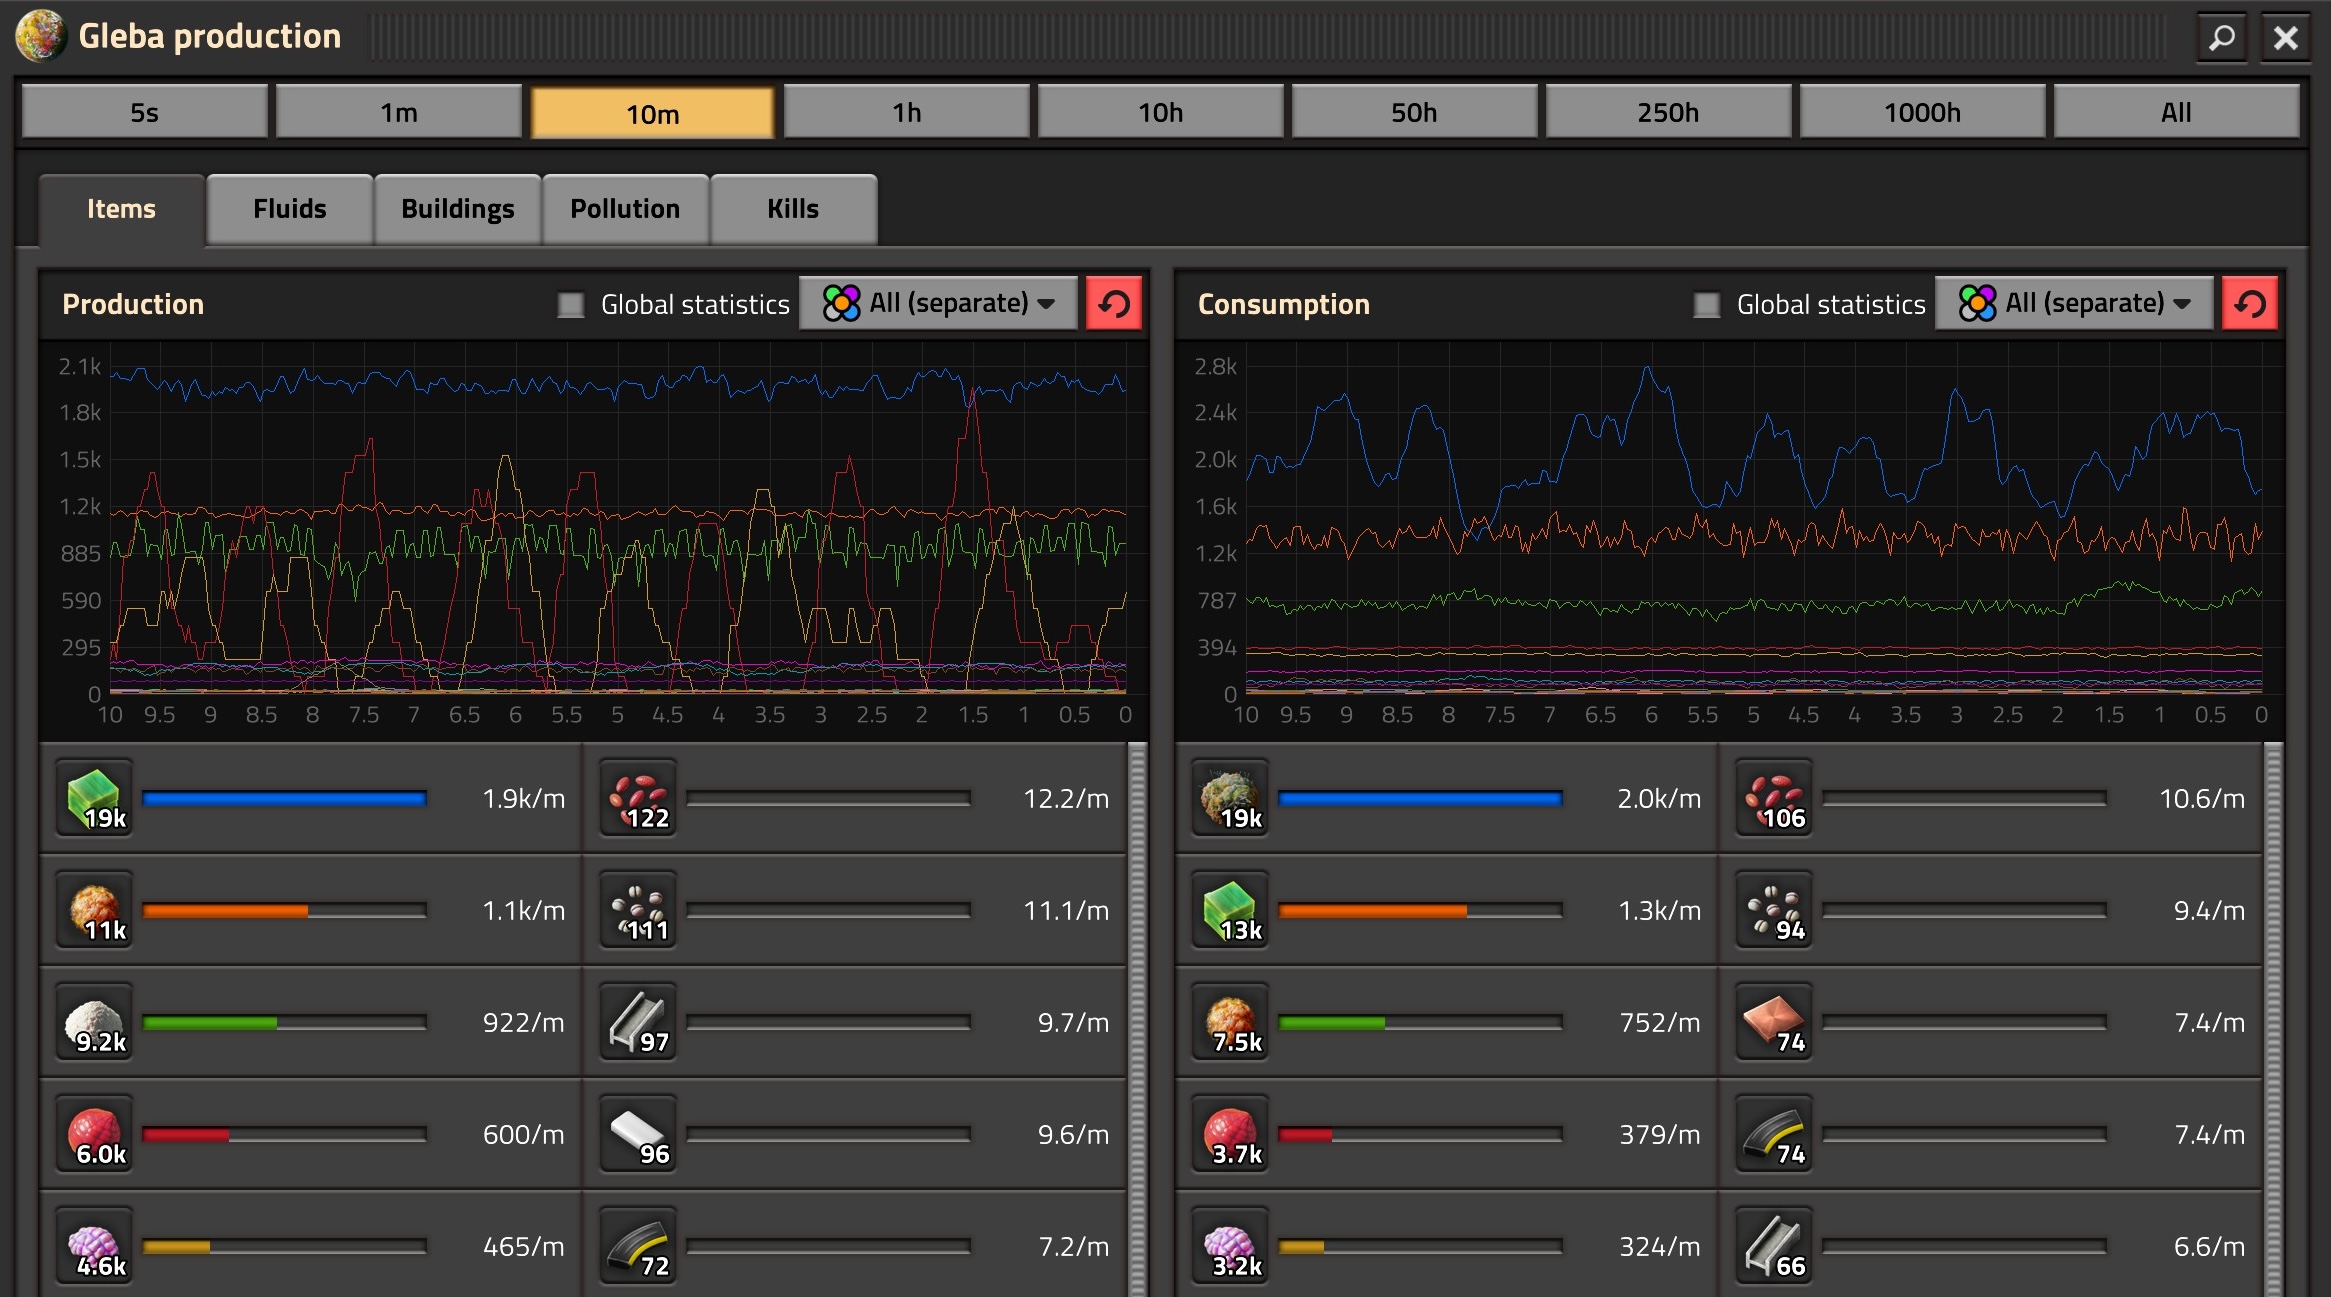
This blog post is from a new run through. I’ve got a basic setup (screenshot above) that is processing fruit fast enough to keep power on and seeds flowing, and provide a few resources. Chart below shows all production and consumption in the existing setup.
Step 1 - bootstrap
Unless you’re lucky or very good, the random ebb and flow of fruit and other Factorio factors means that your fruit factory will occasionally stop, and everything will spoil. You’ll need some way of bootstrapping it back into life.
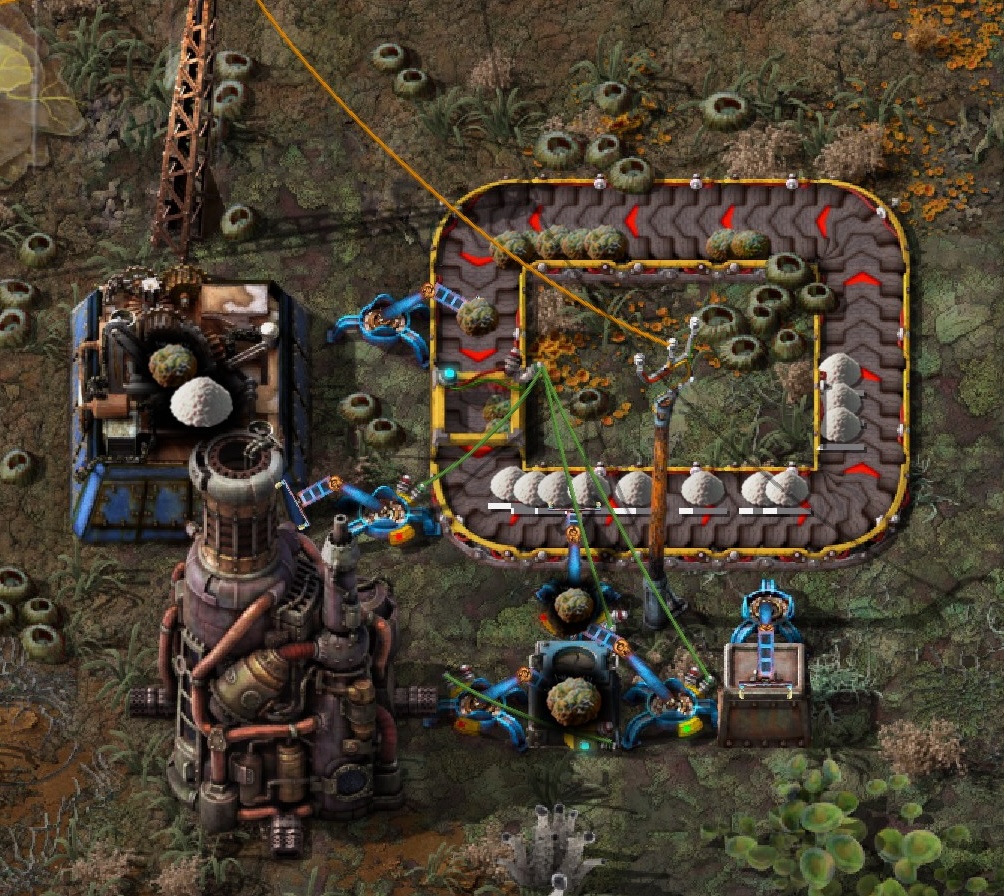
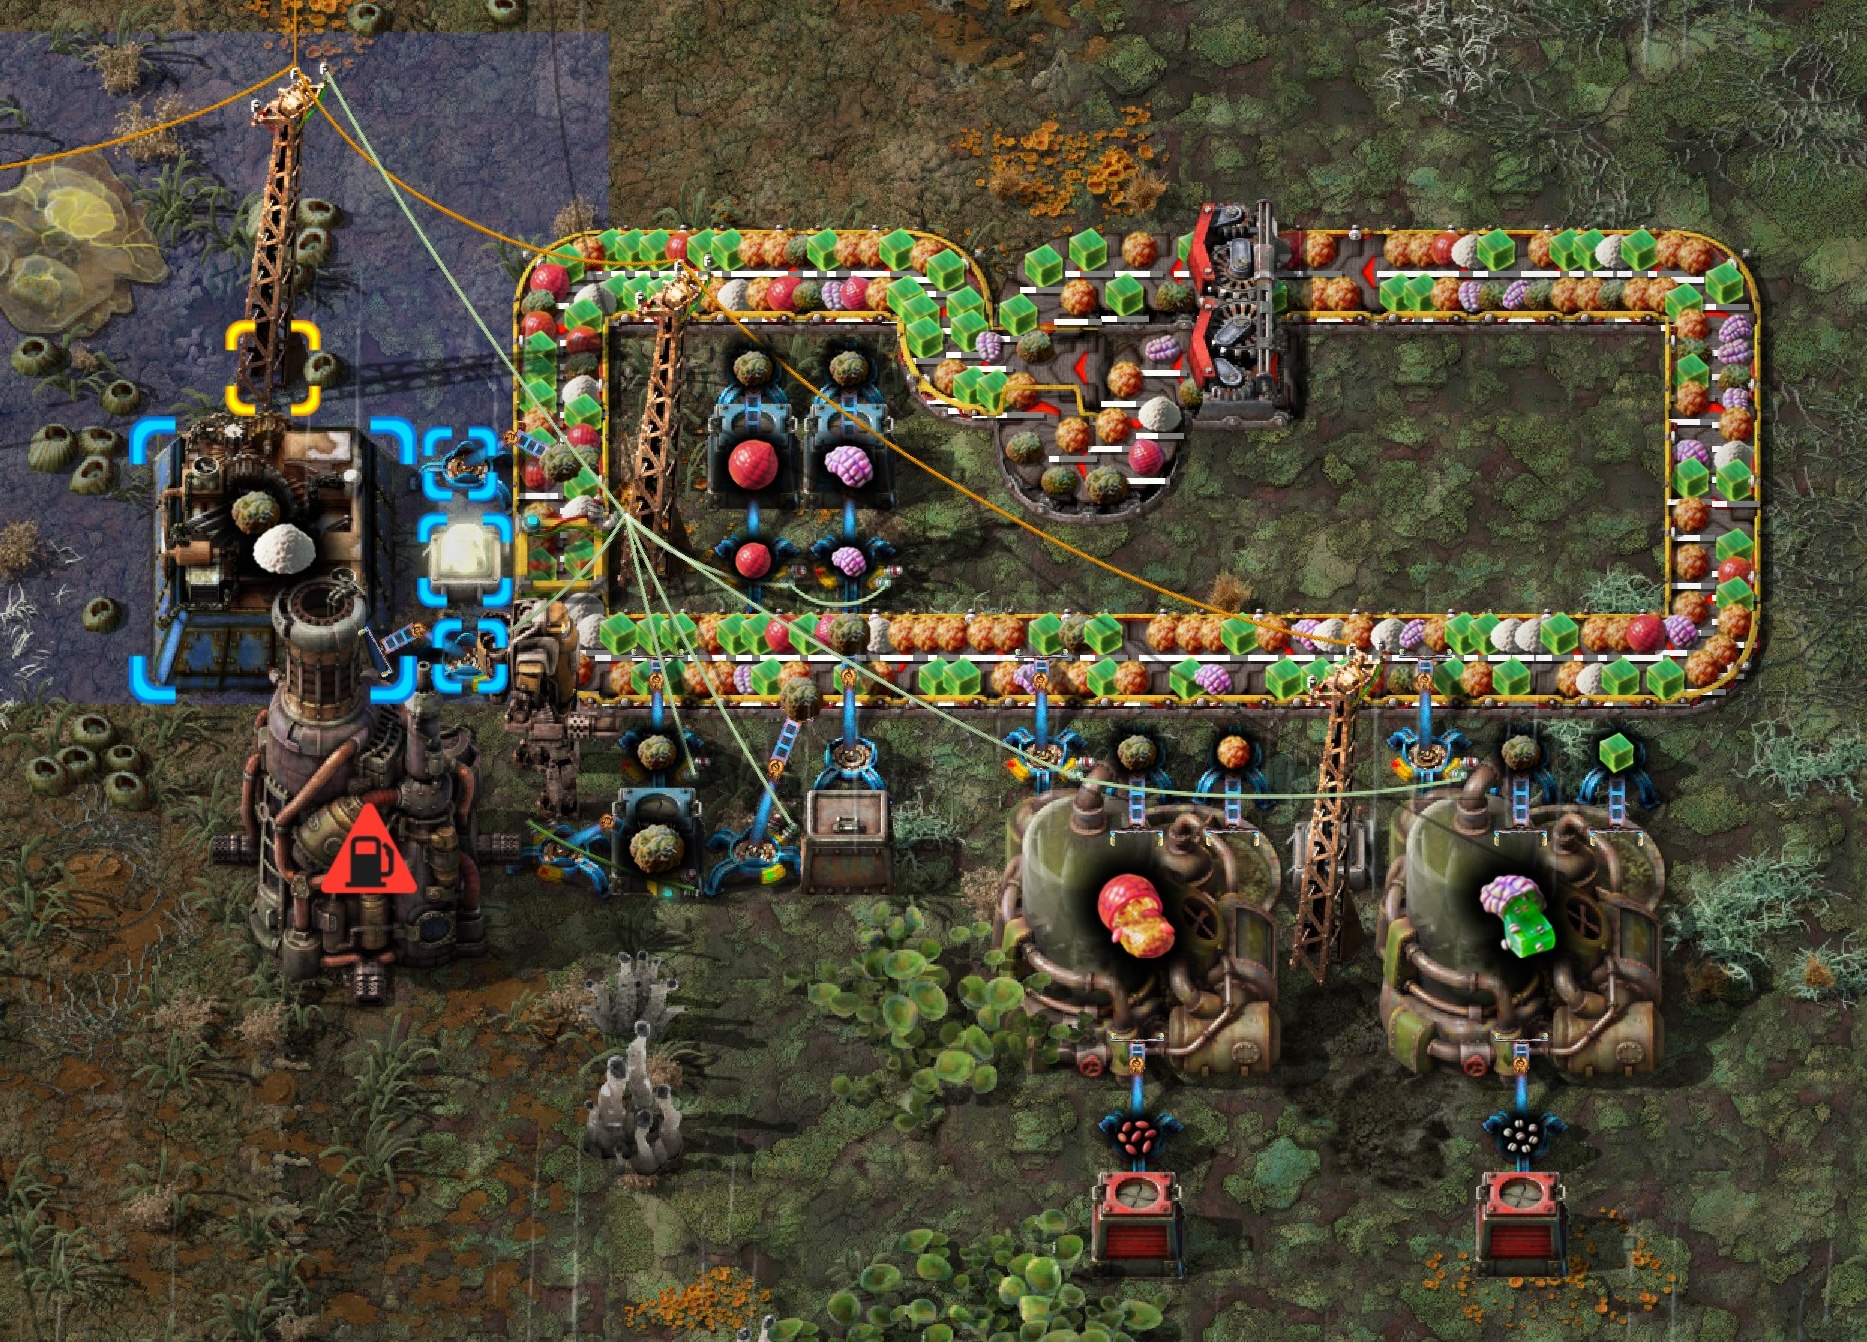
This is a simple little setup with a Requester chest asking my logistic bots to keep it topped up with 50 spoilage; a little circuit-based storage network to manage the spoilage on the belt; and an assembler that turns spoilage into nutrients. The circular belt is known as a sushi belt and is a common Factorio design, you loop all your resources and products around and your factory and pick them up and put them down as needed. You just have to be careful not to clog up the belt, which is the purpose of the circuits, the green wires. They are measuring the contents of the belt and controlling the inserters, so:
- the assembler only creates nutrients, the piles of white powder, when there is less than 10 of them on the belt.
- the inserter leading to the blue requester chest takes spoilage off the belt when there is more than 15 - too much
- it holds it - and if the spoilage drops below 10 on the belt, it starts putting it back
- if the chest holds more than a thousand spoilage, it starts feeding it to the burner on the left, to get rid of it.
This may sound complicated, but it’s needed as the nutrients being created will literally spoil after being on the belt for 5 minutes and turn into spoilage. So you end up with a very dynamic system, with the circuits keeping it in balance.
Step 2 - fruit
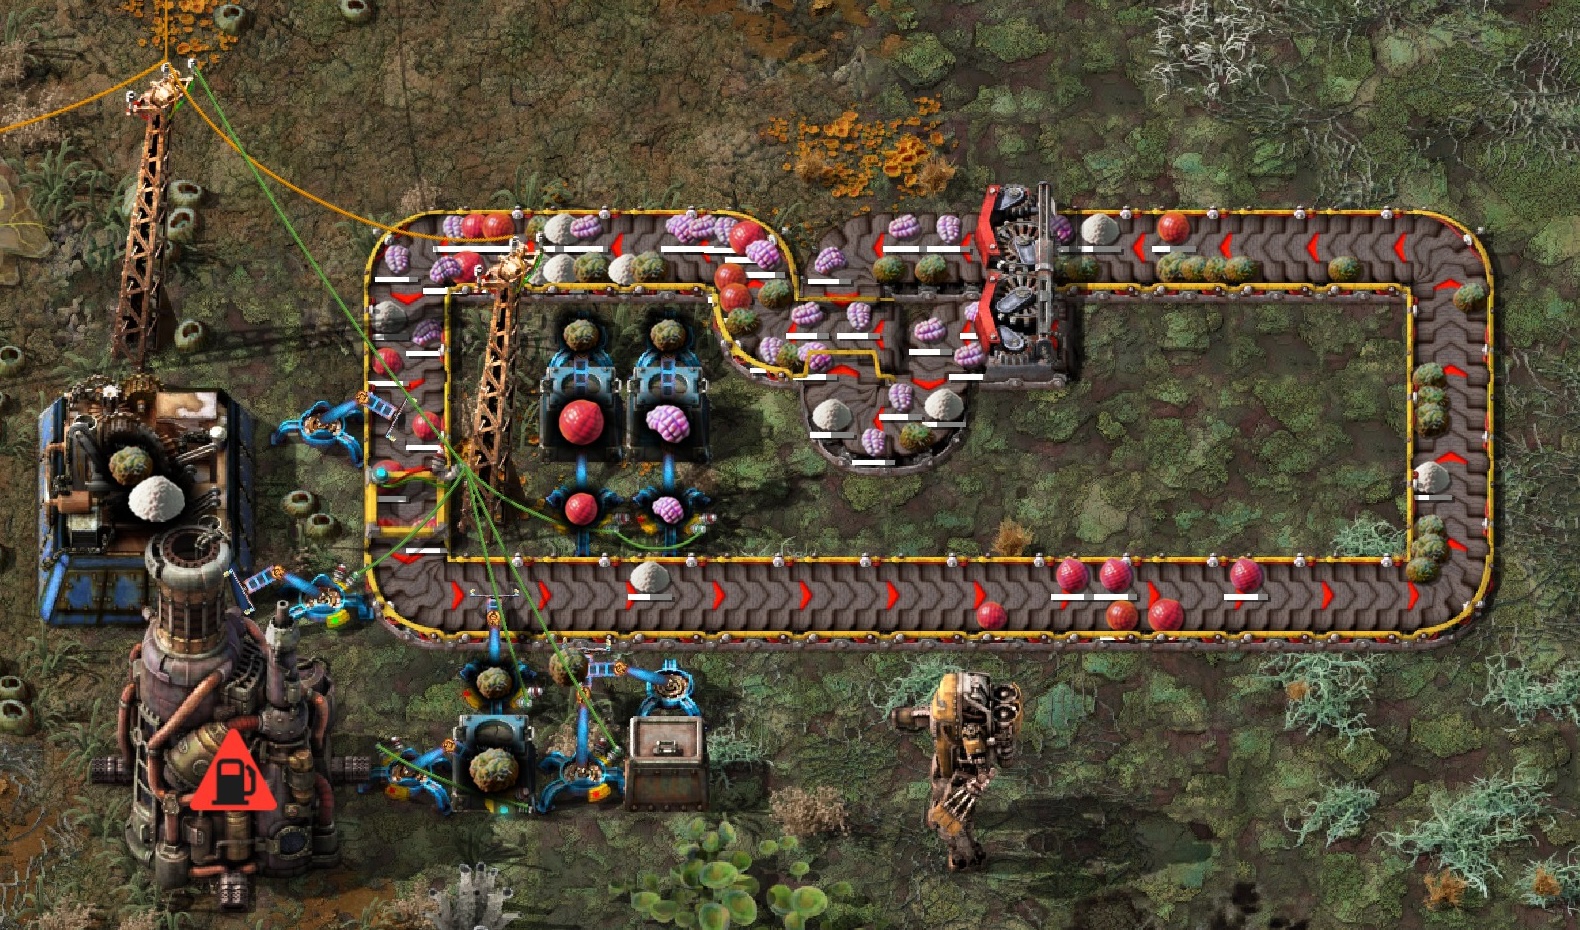
A couple of small changes - two new requester chests to deliver the fruit, the red Yumako and the purple brain-like Jellynut. Both chest are set to 10 … I don’t want too many, as they will spoil - which is why there is a pair of inserters, filtered to only move spoilage, above the chests - any fruit that spoils gets put on the belt.
The inserters below are filtered to only move the appropriate fruit (not spoilage) and are controlled by circuits - aiming to keep 10 fruit each on the belt. In practice it appes to be more, I see about 15, because of timing issues.
I’ve also added a splitter in the return at the top : this simply rebalances the belt, making sure items are on both sides.
Step 3 - fruit processing
Now we start the real work - I add two Biochambers, one processing Yumako fruit into Yumako mash; the other processing Jellynut fruit into Jelly. Both require nutrients - and everything spoils eventually. They both have three inserters above:
- picking the needed fruit AND nutrients off the belt, if the level of the product falls below a limit (50 for now)
- returning anything spoiled to the belt
- returning the product to the belt - I could combine these two, but it’s cleaner like this. There’s another inserter at the bottom filtering the seeds out to a Passive Provider chest so my bots can come pick them up - and that’s why the return inserters are filtered, I don’t want the seeds going onto the belt.
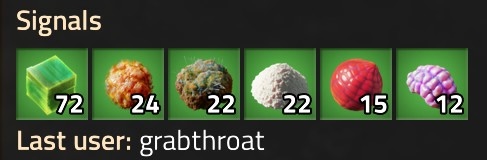
And after a little while, it’s ticking along. I’ve hooked a pole up to the network which is a little trick so I can see what’s on the circuit, and that’s reasonably stable.
And as a double check, I copied the entire little factory, pasted it down for my construction bots to build - and within 30 seconds it was up and running, so it bootstraps perfectly. Nice.
Step 4 - Bioflux and nutrients.
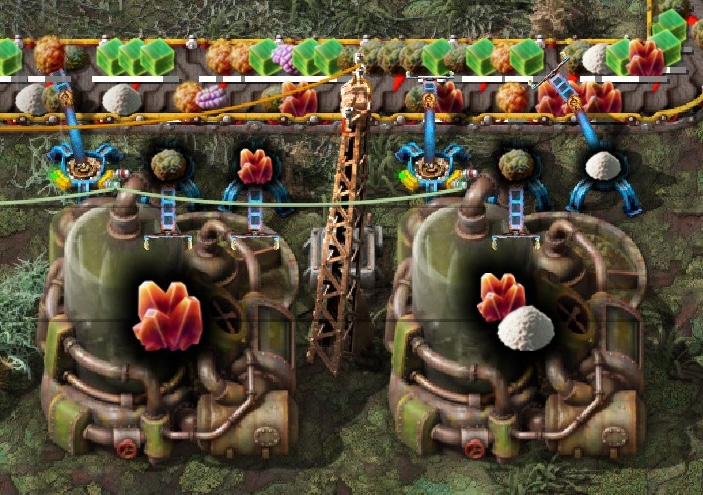
Now we step up to serious preparation. Biochambers require nutrients, and the best way to make these is with Bioflux, which is concentrated and long-lasting. Bioflux is made with Jelly and Yumako mash (and nutrients) and then I can use that to make lots more nutrients - 5 Bioflux makes 40 nutrients, but Bioflux also takes 2 hours to spoil, so you have to be very careful with limits on the belt.
Step 5 - minerals
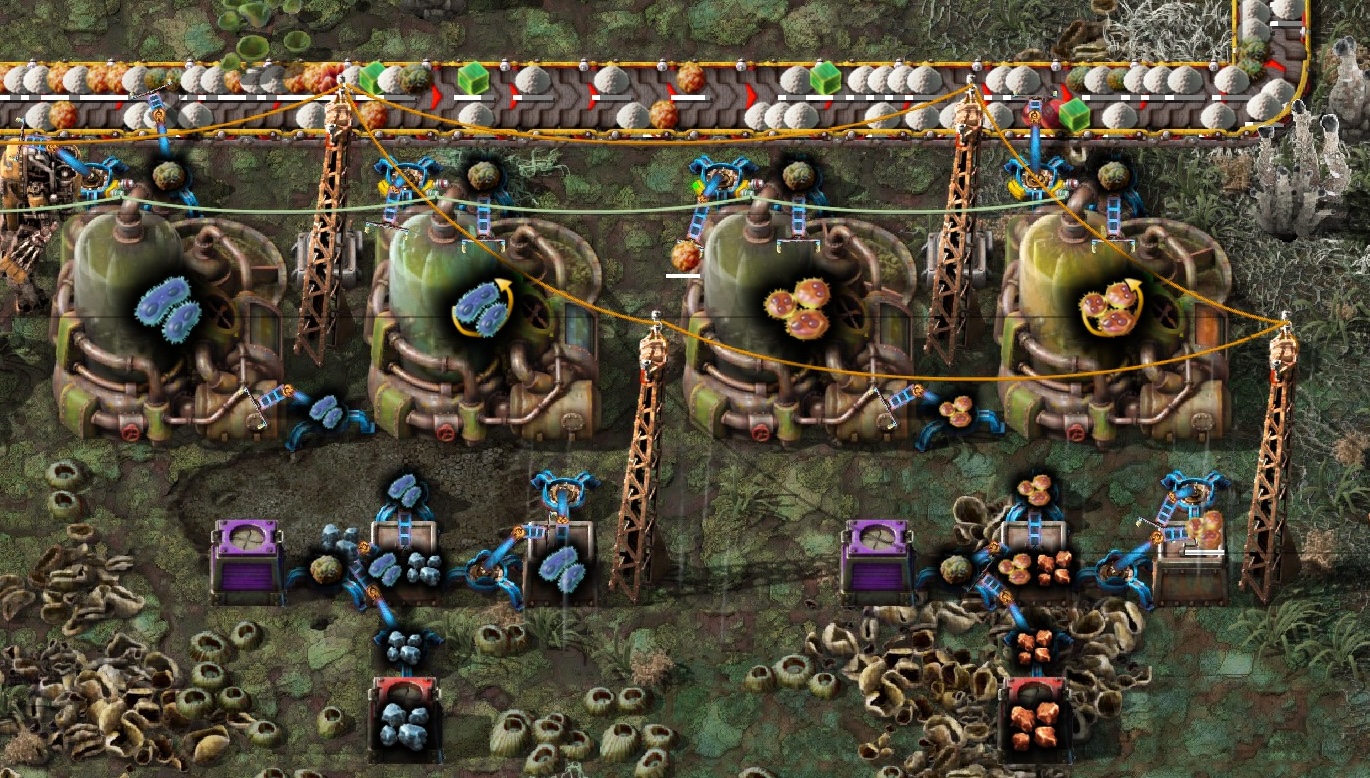
There is some weird science on Gleba, and there are bacteria that decompose into iron and copper ore, the traditional mineral resources. (Iron-creating bacteria, and copper-leaching bacteria both do exist on Earth, so it’s not actually that much of a stretch - Factorio is very well thought out, even the word “Gleba” is Latina and Polish for “earth” or “soil.”)
You need two Biochambers for each of these - one to create the bacteria from scratch, the other to cultivate/amplify them.
These are reasonably complicated though - Factorio always scales the difficulty nicely. The bacteria spoils into the ores quickly, so you need to filter that out into provider chests - but can also spoil into spoilage which needs to be filtered differently. So I have a little 4 chest loop for the two Biochambers : the left creates the original bacteria, passes it directly to the second (skip the belt - nothing else will use it, and it spoils too quickly) which cultivates it, passes it out to a transfer chest which immediately passes it to a holding chest. While the bacteria is here, it can (a) be passed back into the cultivator to make more (b) spoil into ore, and put into the provider, or (c) spoil into spoilage, being put into the purple Active provider chest which the bots will empty as soon as possible.
A small difference, too - unlike the early Biochambers where the inserters from the belt were limiting how much output was put back on to the belt, these later ones are limited to how much input is available on the belt - so that I don’t starve the early ones which are producing intermediates.
Step 6 - the others
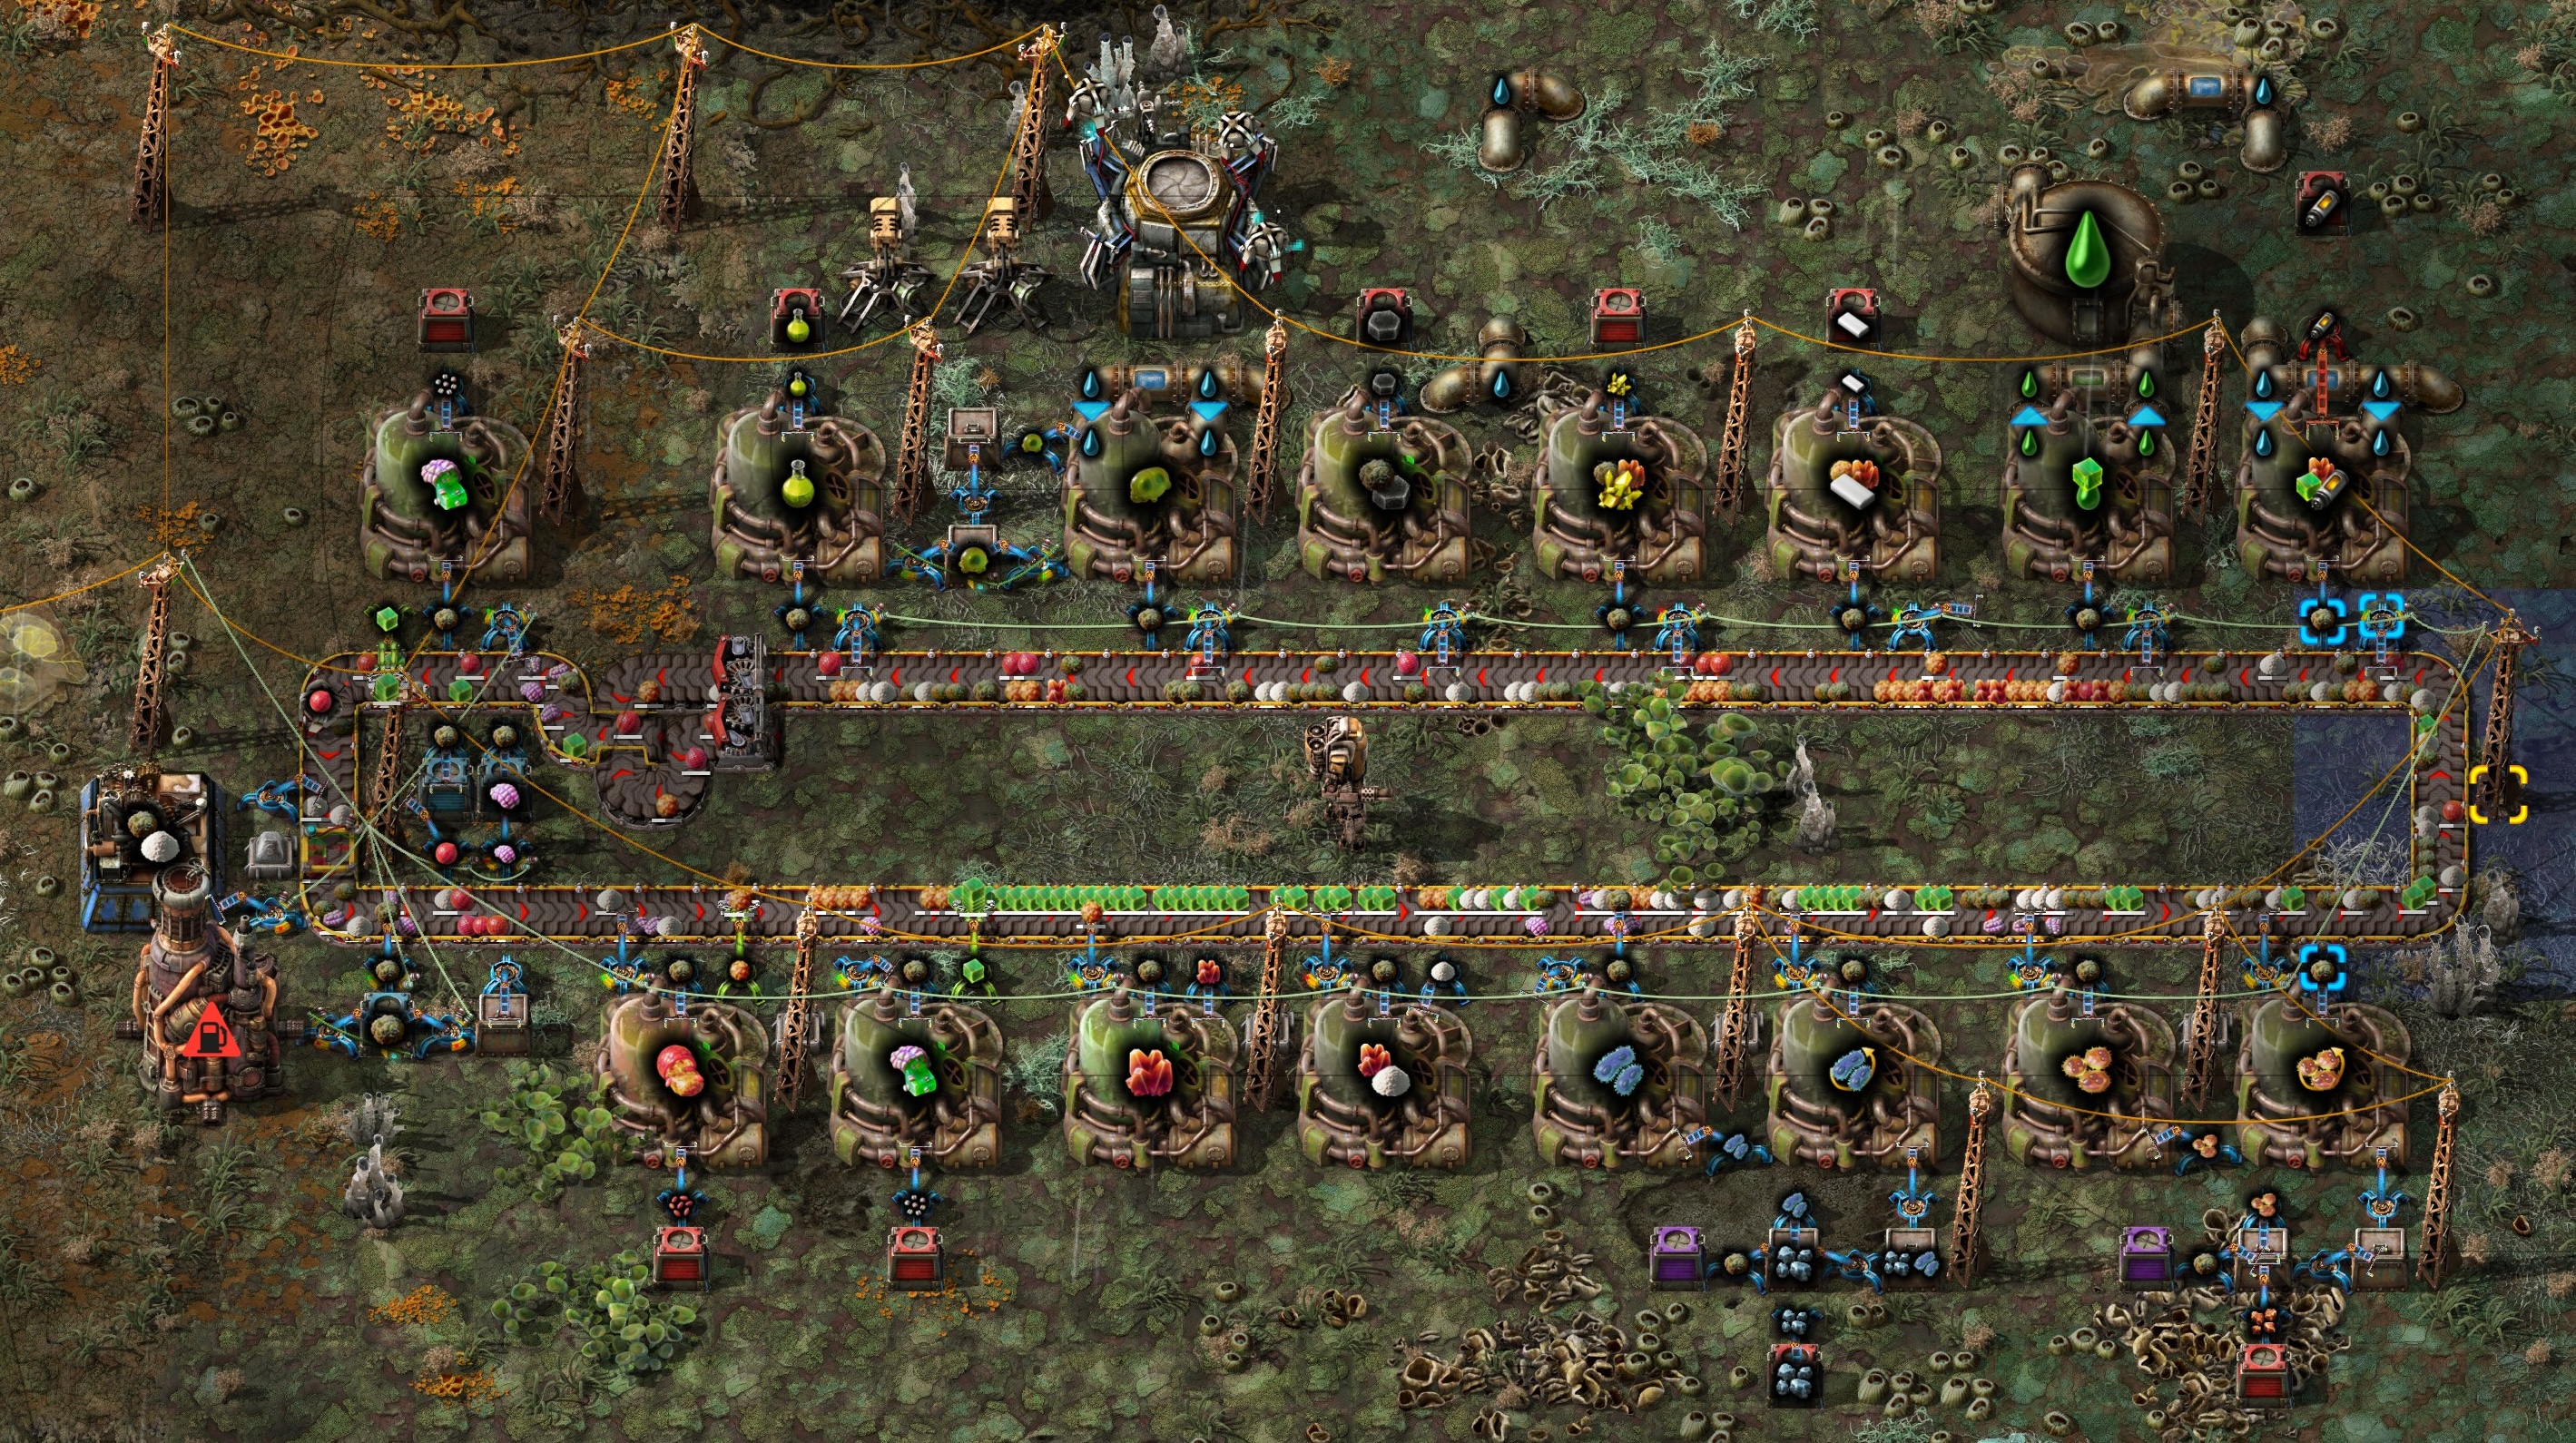
Now I sometimes extend out to the right to make a long thin factory, but this time I will extend onto the return loop at the top and create (right to left, following the belt):
- Rocket fuel - needs water (always available on Gleba), Bioflux and Jelly.
- Lubricant - from Jelly
- Plastic - BioFlux and Yumako mash.
- Sulphur - spoilage and Bioflux
- Carbon - spilage
Again, all are limited by the input available on the belt.
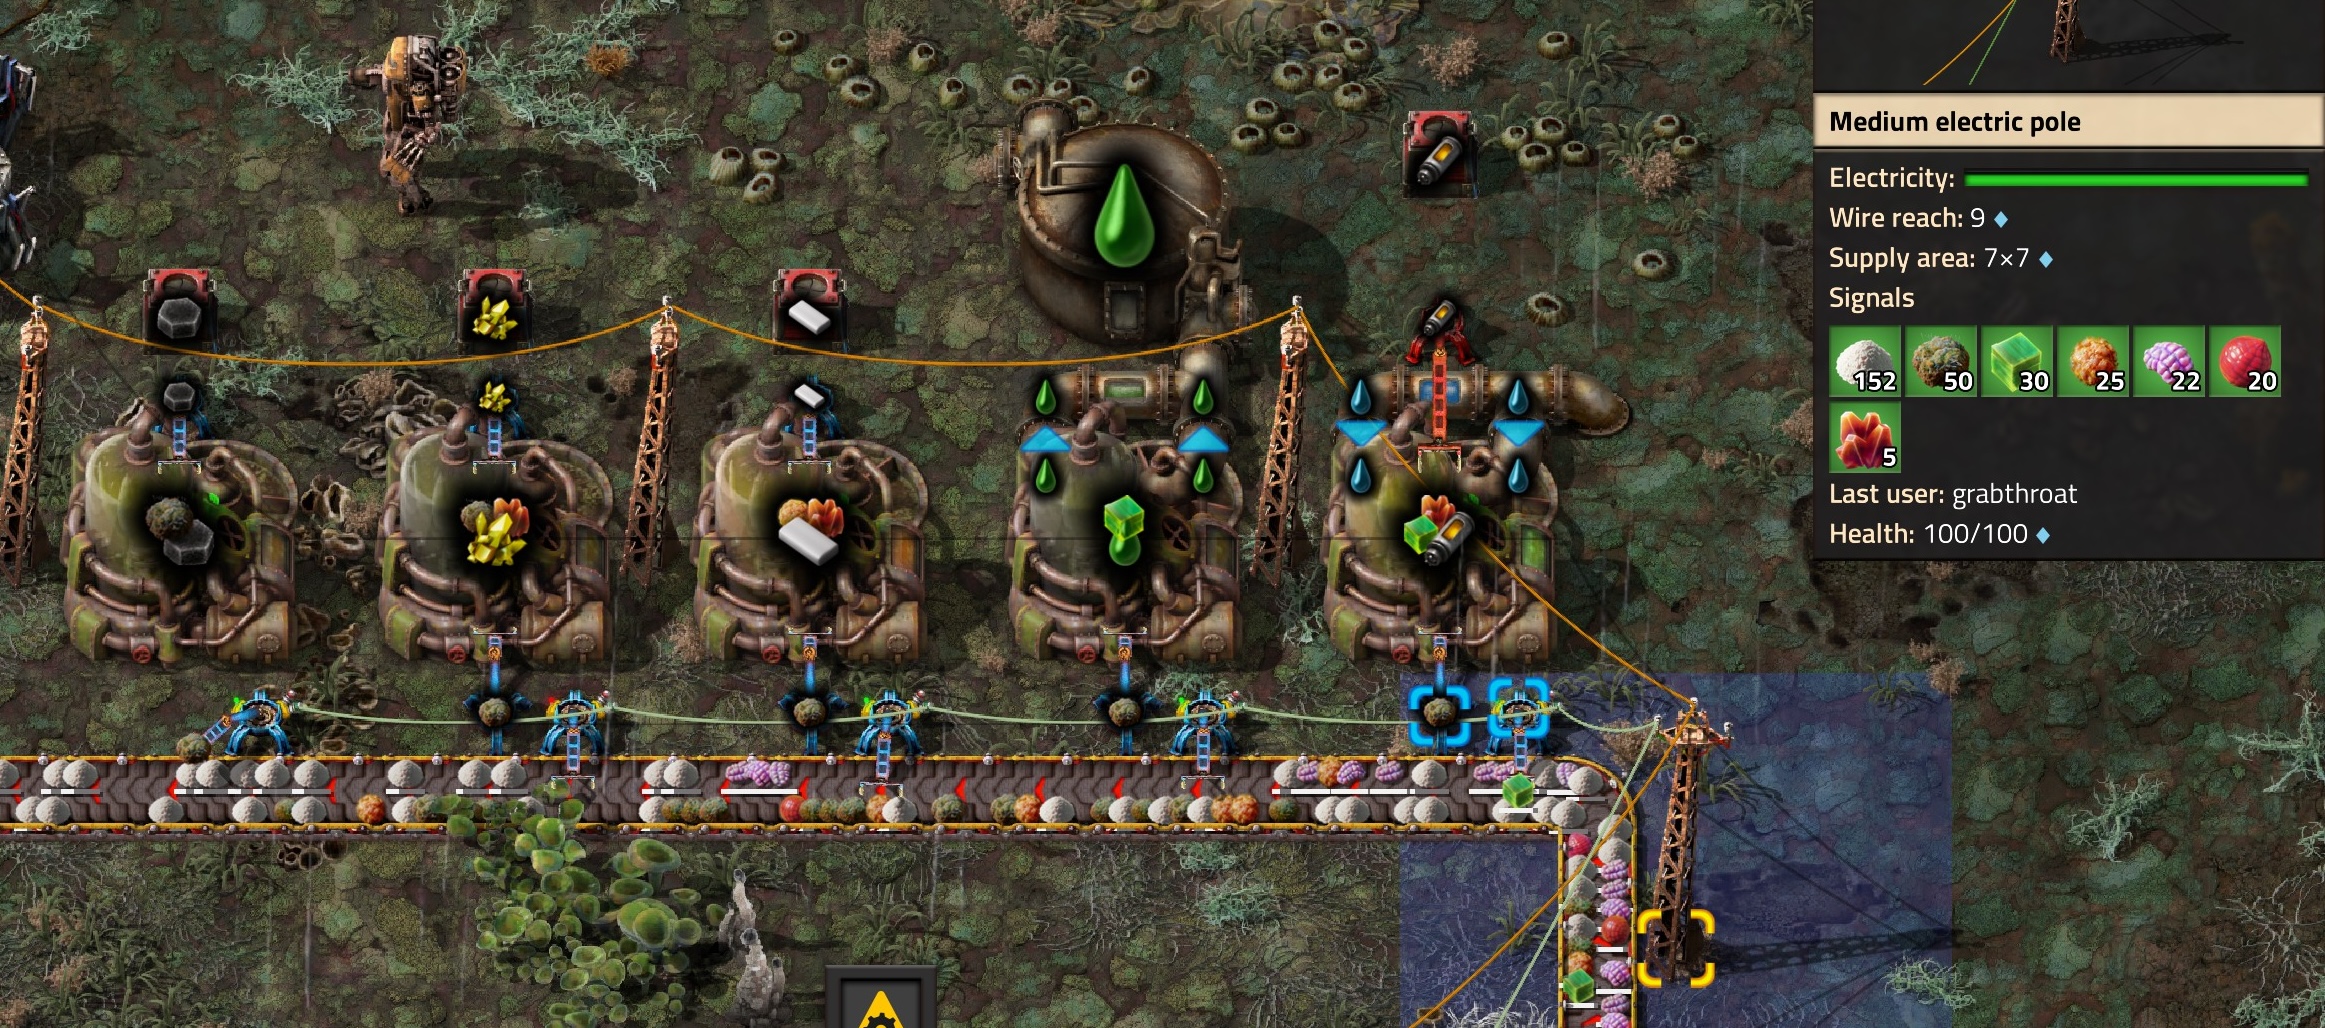
Not in the screenshot, I’ve added a second Jelly Biochamber. Watching the belt, it was consistently low.
Step 7 - the scary stuff
I’m on Gleba to make Agricultual Science which needs Pentapod eggs - Pentapods are the scary native monsters - as an input - and these eggs decompose into live wrigglers which then attack your factory. So that’s a problem.
So I leave a couple of lasers ready to shoot them, and my bot network has repair packs ready to go.
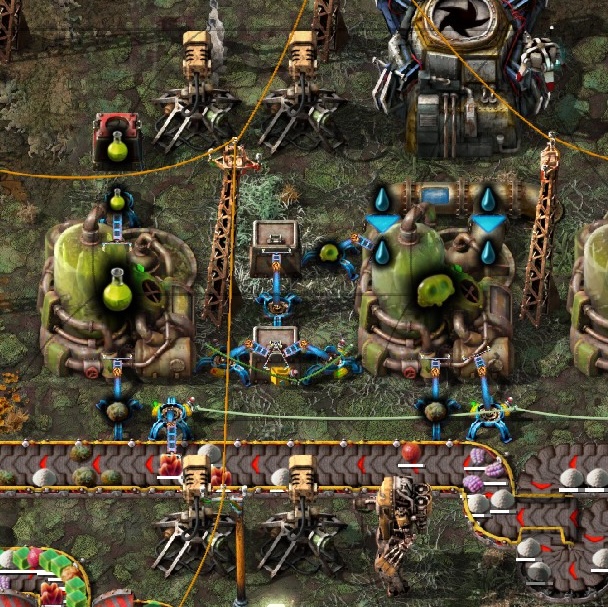
Pentapod eggs are also used to make more Biochambers, so I’ll later be adding a inserter to grab “spare” eggs to make more Biochambers.
Step 8 - and balance …
Now it’s complete … so becomes a matter of watching the levels of items on the belt, and tuning all of the inserters so we get the right balance. I often think about making the belt zig-zag down the middle to make it longer and have more storage, but I need to balance that against how long it takes items to get round, and also to keep spoilage in mind.
Step 9 - and scale …
This is why we play Factorio. Once you’ve got a factory working, just copy and paste it for scale.
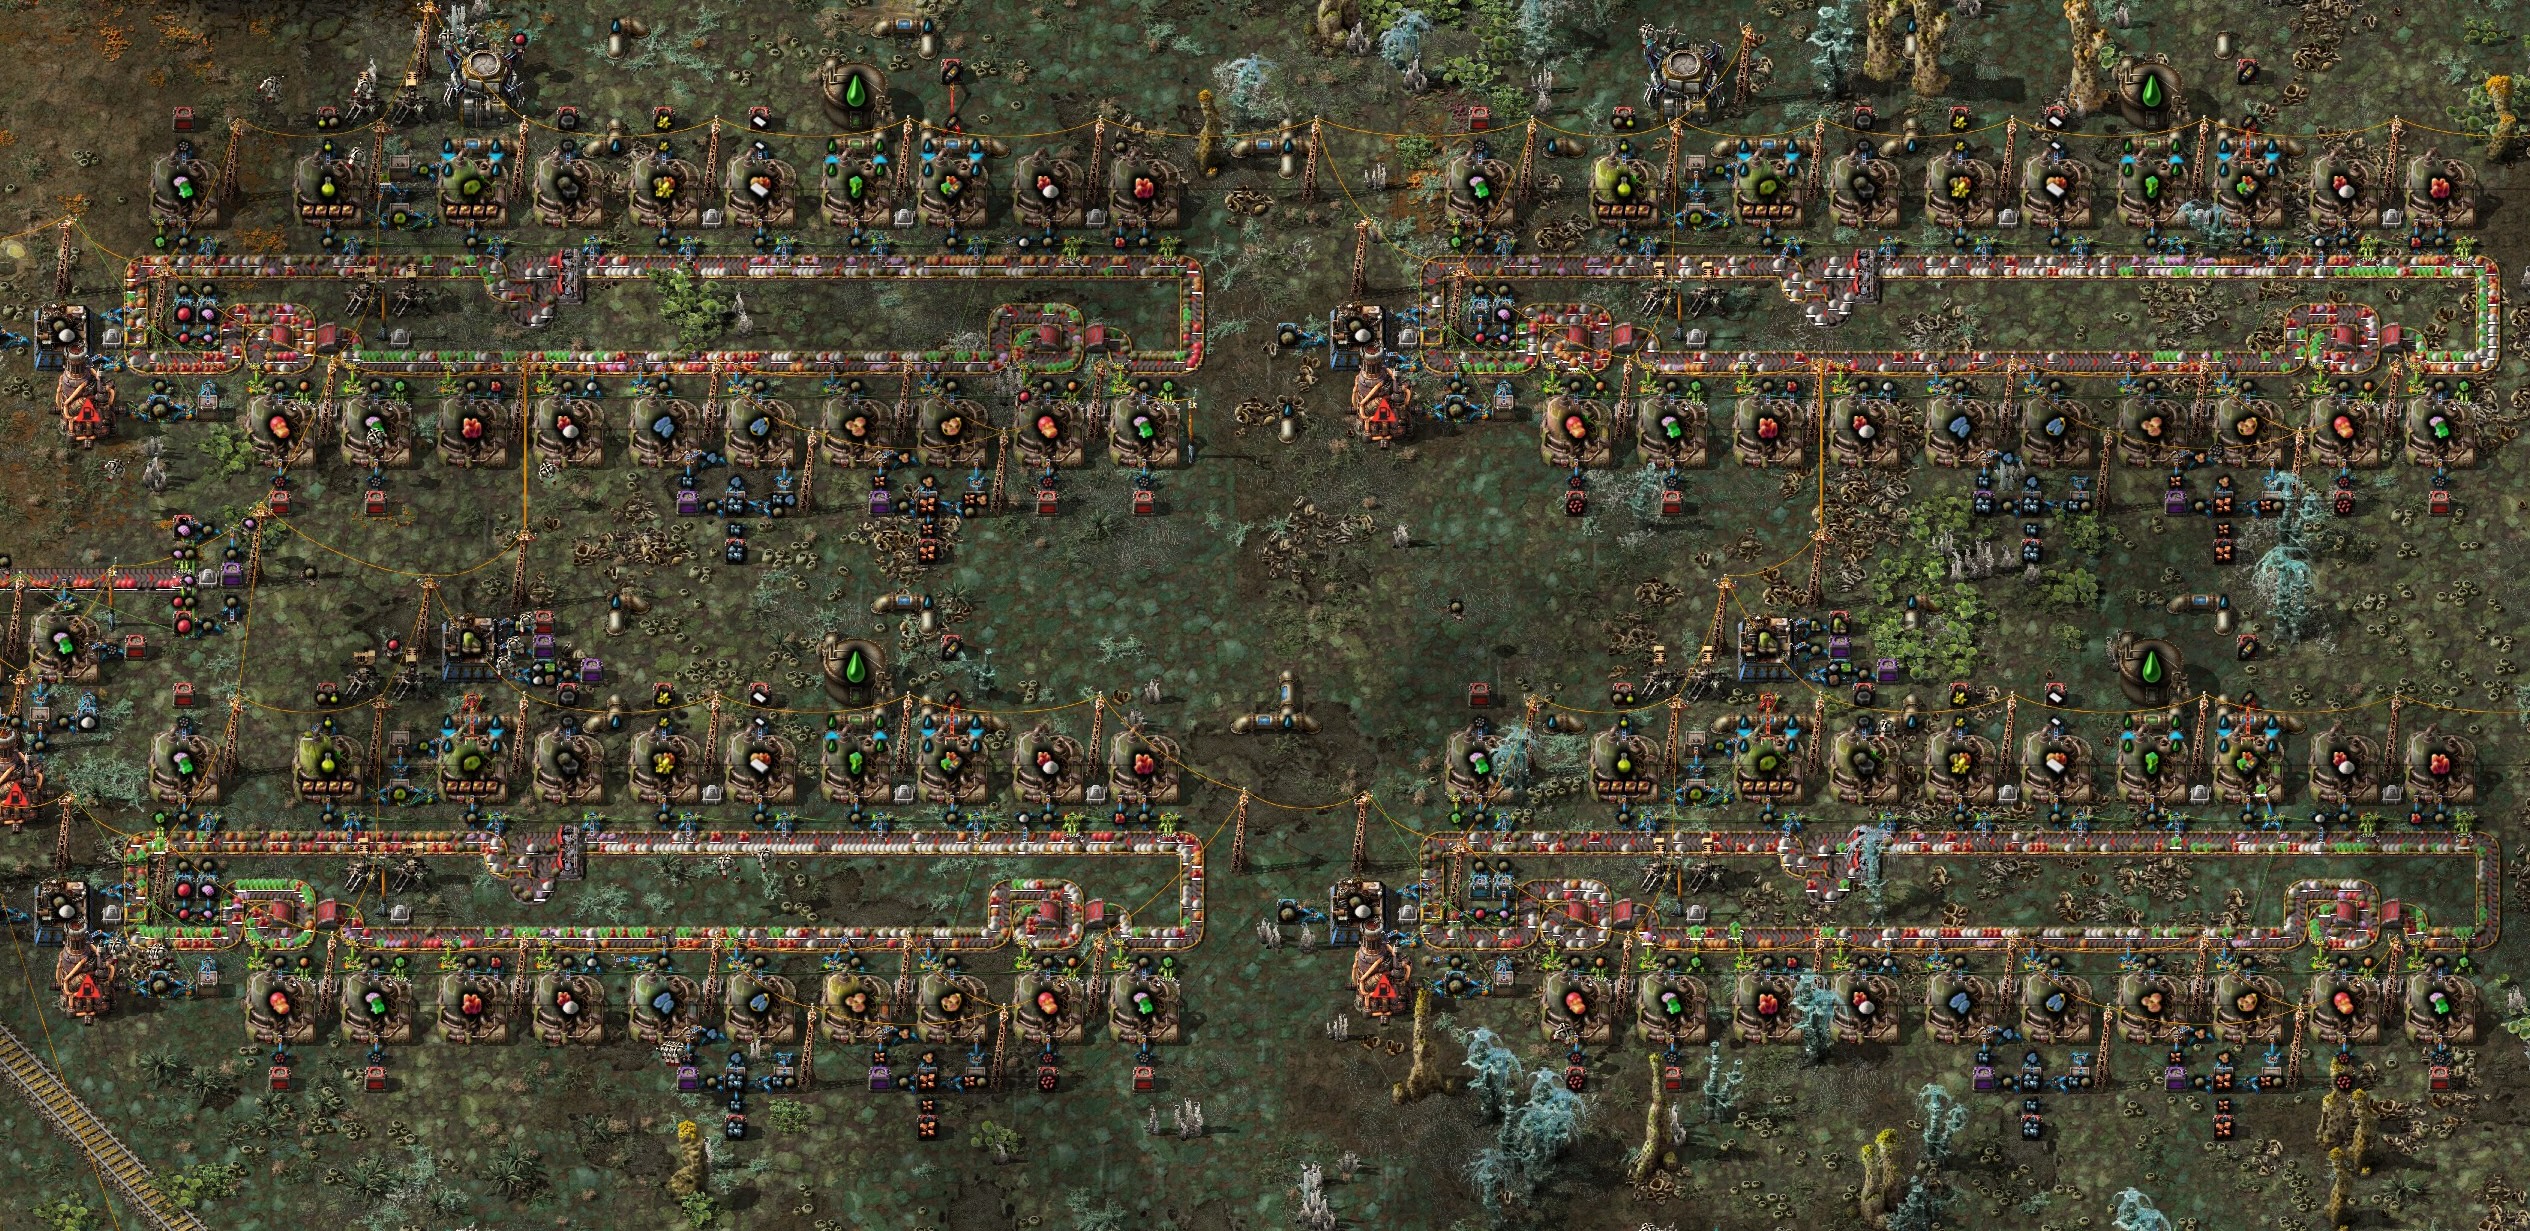
Four of them, and some productivity modules, and I’ve got my 60 science / minute that is this run-through’s goal.
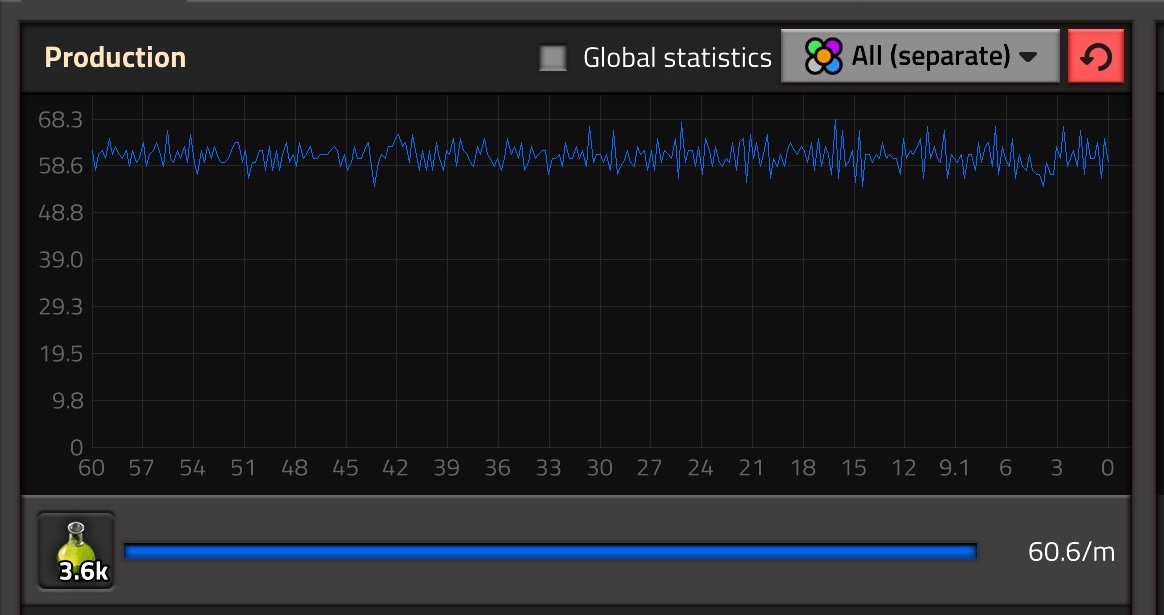
Now I just need to get it back to Nauvis.